Wednesday, November 30, 2011

Dining in Dallas Part 2

I had to share with you my dining experience at Bistro 31. Bistro 31 is a new European inspired restaurant that opened its doors in October in Highland Park Village. I met a high school friend there on a Tuesday night at 7:45pm. To my surprise, every table was full. Our wait was only 15 minutes and definitely worth it. Let me begin by saying this restaurant is decorated beautifully. We loved the ambience so much that we stayed there until closing! They sat us in these wingback chairs that were so unbelievably comfortable that I wanted to take them home with me! 

Anyways, onto the food. For an appetizer we started off with the foie gras. For those of you that do not know what foie gras is, it is the fatty part of the liver from a duck or goose. I know it sounds gross, but it is heavenly when prepared the right way. I especially enjoyed Bistro 31's foie gras as they served it with roasted figs and pistachios. It was the perfect blend of sweet and savoury. For entrees, my friend and I shared the seared diver scallops and brioche crusted lemon sole. Both dishes were delicious but if I had to choose my favorite, the scallops were phenomenal. I am always hesitant to order scallops at restaurants because the portions are always so small. This restaurant served four plump scallops over yukon potato mousseline aka mashed potatoes. This combination hit the spot and the scallops were seared to perfection. This restaurant is a great addition to the Dallas dining scene and is definitely worth trying.
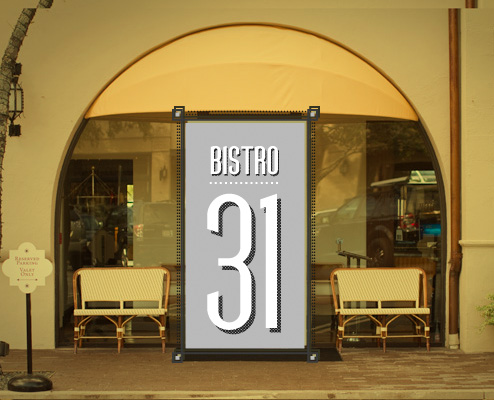
bistro_31
Bistro 31
87 Highland Park Village #200 (next to Vince)
Dallas, Texas 75205
(214) 420-3900 Pin It

Tuesday, November 29, 2011

Dining in Dallas Part 1

I just spent a week in Dallas and ate at two restaurants worth checking out. The first restaurant, Hattie's, is located in the Bishop Arts District of Dallas. Open for 10 years, this restaurant consistently delivers delicious food in a warm and inviting ambience.
If you go here, the fried green tomatoes are a must for an appetizer.
I ordered the pecan crusted catfish served over a bed of mashed potatoes with seasonal vegetables. The catfish came with a lemon butter sauce that I got on the side and did not even use. 
My dad ordered the meatloaf which you can't go wrong with here!
The salmon served with sticky black rice was good but nothing special. However, if you are looking for a lighter dish at this restaurant, I would suggest this as most of the dishes are very filling and heavy.
Just a tip when ordering...I recommend you get the sauce on the side for whatever entree you choose because every dish tends to be drenched in sauce. If you do not believe me, checkout the picture of the meatloaf above. Also, most of the entrees are so flavorful that you do not even need the sauce!

Be sure to walk around the Bishop Arts District after dinner as there are a lot of neat art galleries and shops in the area which are open late too. Ten years ago you would not dare come to this area by yourself but now this area is booming and full of life!
Hattie's
418 North Bishop Avenue
Dallas, Texas 75208
(214) 942-7400

Pin It

Monday, November 28, 2011

A Vase Like No Other

Happy Cyber Monday!! Hope everyone had a fabulous holiday weekend and bought lots on Black Friday and Small Business Saturday! I thought this vase was so clever and I could not resist showing it to you! This is a great gift to give for a housewarming party or as a hostess gift.
I love how modern this vase is. This particular vase comes from Halls in Kansas City but I have seen other versions of this vase at the Nasher Sculpture Center store in Dallas, Texas.

HALLS PLAZA
211 Nichols Road
Kansas City, MO 64112
816-274-3222

Pin It

Thursday, November 24, 2011

My Thanksgiving Feast

This week I took a break from cooking. I got a few requests to post Thanksgiving recipes but unfortunately I was not home to cook. Lucky for me, our grandparents invited us over for a wonderful turkey dinner. I wanted to share with you my amateur photos from our dinner.

Our grandmother used her Sterling silver flatware as well as her beautiful fine china to set the tables. Seeing her tables set so beautifully makes me so excited to use my fine china which is in transit from Germany as we speak.

Our grandmother used a different pattern of china for the kids table!

Last but not least, check out this spread of food. Yum!

It is very impressive to me that our grandparents can throw together such an affair. I have lots to learn from all three of my grandmas and grandpa! I hope to share with you some of these family recipes when I get back to cooking next week.

Pin It

Wednesday, November 23, 2011

Pre Black Friday Shopping

I started my holiday shopping early this year. I found the perfect gift for the person who loves wine and is difficult to buy for. This gift is called the "Corkcicle".
Below are the directions on how to use the Corkcicle.
I gave this to my dad as an early birthday gift and let's just say it was a huge hit.
My dad said not only does the corkcicle look cool in the wine bottle but it actually chills the wine to the perfect temperature! The only catch with the corkcicle is that you should use it for a pre-chilled bottle of white wine or a room temperature red.
You can find this nifty gift online at http://corkcicle.com/ or at many stores in the US.
Oh and by the way, this company did not pay me to advertise. I wish!
Pin It

Tuesday, November 22, 2011

Cornbread Made Easy

If you do not recall, last week I made a big pot of chili. To accompany the chili, I made cornbread. I despise dry cornbread and this recipe makes the most moist cornbread ever! This recipe originated from the back of the Gladiola Cornbread mix however I added an ingredient and made it healthier!! It is so yummy!
Ingredients
1 Package of Gladiola's Mexican Style Cornbread mix
1 Cup of creamed corn
1 Cup of reduced fat shredded cheese
1 Egg
1/3 Cup of skim milk
1 Tbsp of sugar

Directions
Preheat oven to 425 degrees.
Mix all of the ingredients in a bowl.
Spray nonstick cooking spray into a square Pyrex dish or 8 inch oven-proof skillet. Place in the oven for 7-8 minutes without the cornbread mixture in it to get the dish hot.
Remove dish from the oven and fold the cornbread batter into the hot dish.
Cook for 20-25 minutes until the edges of the cornbread turn a golden brown.
Enjoy! Try not to eat the whole pan by yourself!!
Pin It

Monday, November 21, 2011

What Not To Do

Yes, this is what happened to me on Friday night. I decided to use this free sample of "dishwashing liquid" which obviously was not meant to go into the dishwasher. Lesson learned. Never use dishwashing liquid aka Dawn in the dishwasher unless you want to have a bubble bath in the kitchen!
Pin It

Friday, November 18, 2011

Snack for the True Healthnut

Seriously, this recipe is for those people who want a healthy snack. It is not good enough to serve at a party so do not make it because your guests will not be happy with you. This was my second time to make roasted kale and I finally figured out the key to making the kale crispy. After you wash the kale, you have to make sure the kale leaves are completely dry before placing them in the oven. If they are not dry, your kale will turn out soggy and wilted. This is what happened the first time I made this recipe. Also if you do not like greens, you will not like this recipe.
Ingredients
1 bunch of kale
1-2 tbsp of olive oil
Kosher salt
Directions
Preheat oven to 350 degrees.
Line a baking sheet with parchment paper or foil.
Wash the kale and dry thoroughly.
Peel kale from the stem into bite-size pieces.
After peeling the kale, blot dry with a paper towel. If you have a salad spinner, you can put the kale leaves in it to spin the water out of the kale.
I had so much kale that I put it on two baking sheets.
Drizzle olive oil over the kale leaves and use your hands to toss and coat the leaves.
Bake in the oven for 12-20 minutes. Check on the kale at 12 minutes and if the leaves are paper-thin and flaky, they are done! If not, leave them in for another few minutes. Make sure the kale does not burn and turn brown otherwise it will taste very bitter.
Season with kosher salt after you remove from the oven.
Pin It

Thursday, November 17, 2011

Kansas City Black Bean Chili

This is my mom's original chili recipe. If you want to win a chili cook-off, make this recipe! It is guaranteed to impress. 
Serves:  approximately 12 bowls (4 quarts)
Ingredients:
1 medium chopped white or yellow onion
1 fresh jalepeno (deseeded and white pith removed), chopped finely
1 ½ tsp. olive oil
1 lb. lean ground beef, round, or chili meat                                                       
       (cooked with a dash of garlic salt & drain fat)
1 lb. lean or white ground turkey breast (cooked with garlic salt & drain fat)
1 lb. Jimmy Dean’s reduced fat Pork Sausage (cooked & drain fat off, no 
         extra salt added to the sausage during cooking, as it’s salty enough)
2   pkgs. Williams Original Chili seasoning (says no salt added on the pkg.)
2  -14.5oz. cans diced tomatoes (use liquid)
3  -15oz. cans tomato sauce (I used 1-30 oz can and 1-15 oz. can)
2  -15oz. cans  Black Beans (drained and rinsed)
1 - 4 oz, can chopped green chilies (use liquid)
1 ½ Tbsp. light brown sugar
1 tsp. garlic salt (you may add more to your taste)
Directions
Brown the meat (ground beef, ground turkey and sausage), one at a time in the microwave in a pyrex measuring cup, covered with a paper towel.  Crumble the cooked meat every few minutes with a fork. It should take about 5-7 minutes per pound of ground meat in the microwave. Drain fat into a can (do not put down disposal).
***Remember to add a few dashes of garlic salt to the ground turkey and ground beef before cooking it in the microwave.
In a large pot, saute onion, jalapeno and 1 1/2 tsp. olive oil until soft.
Combine the rest of the ingredients (ground beef, ground turkey, sausage, diced tomatoes, chili seasoning, tomato sauce, black beans, green chiles, brown sugar, garlic salt)  in the same pot that you sauteed the onion and jalapeno in. 
Here is your finished product. Yum!!!!
Tips:
  • Serve chili with fritoes (small size), finely shredded mild cheddar cheese, chopped white onion and corn bread.  You can also serve this with tamales, hot dogs & buns for chili dogs, or saltine crackers. 
  • It is best to make this a day ahead of time to meld the flavors!
  • If you want more of a “kick” and you want it to have more liquid, add 1 - 6oz can of Spicy Hot V-8 juice.
  • You can always freeze the leftovers!
Pin It

Wednesday, November 16, 2011

Rockfish with Mango Salsa

I made this healthy fish entree last night. If rockfish is not available at your local supermarket, you can use another mild white fish such as halibut or cod. Also, this recipe originally called for peaches instead of mangos. For the salsa, you can use peaches, mangos or pineapple depending on what is in season. I used mangos because those were the most ripe!
Ingredients
3/4-1 pound of Rockfish (serves 2)
Kosher salt and pepper
1 tbsp extra-virgin olive oil
1 large ripe mango, diced 
1/2 small onion, finely chopped
2 tbsp fresh cilantro, chopped
Juice of 1/2 lime
Lime wedges for serving (optional)

Directions
Preheat the oven to 425 degrees.
Rub rockfish filet with salt, pepper and olive oil and bake in the oven for 8-10 minutes, depending on size or until fish is opaque and can be easily flaked apart with a fork.
Either prior to cooking the fish or while the fish is baking, make the salsa. Combine mango, onion, cilantro, and lime juice. Season with salt and pepper to taste.
Serve fish topped with mango salsa and a wedge of lime on the side.
***Call the grocery store ahead of time to ensure rockfish, cod or halibut is available.
This recipe originated from the website, Yumsugar.

Pin It

Tuesday, November 15, 2011

Balsalmic Roasted Brussels Sprouts

I am on a mission to find the best brussels sprouts recipe. This one was good but still not my favorite. I wanted to share it with you anyways because I think it is still worth trying. The red onions add a nice touch to this recipe though.

Ingredients
1 pound of fresh brussels sprouts
1 1/2 tbsp of olive oil
1 tbsp balsalmic vinegar
1/4 red onion (thinly sliced)
Kosher salt and pepper to taste

Directions
Preheat oven to 400 degrees.
Wash brussels sprouts well. Cut the stems of the brussels sprouts and remove the outer leaves from the brussels sprouts.
Cut brussels sprouts in half lengthwise and in quarters if you have large brussels sprouts.
Place brussels sprouts and onions on a foil-lined baking sheet.
Add olive oil and balsalmic vinegar to the pan and mix with your hands to evenly coat all of the brussels sprouts. 
Season with salt and pepper and place in the oven for 25 minutes.
***Check on the brussels sprouts every 10 minutes or so and shake the pan to evenly brown all sides of the brussels sprouts.
While the brussels sprouts did taste good, I would have liked them crispier so stay tuned for my next brussels sprouts recipe!!


Pin It

Thursday, November 10, 2011

Pan-Seared Trout

I have had quite a few mishaps with searing fish but I finally got good results! We used Rainbow Trout this time and it was a success. A lot of restaurants drown their fish in a sauce to get rid of the fishy taste that comes with cooking fish. If you are buying fresh fish from your local supermarket, it should not have this "fishy" taste. Therefore, we love pan searing fish because we enjoy the actual quality of the fish without all the butter sauce added.
Yield-2
Ingredients
4 small filets or 2 large filets of Rainbow Trout
1 Tbsp of olive oil
Salt and pepper
Nonstick Pan

Directions
Begin by sprinkling salt and pepper to the "belly" of the fish.
Place 1 tbsp of olive oil into your nonstick pan and place on high heat.
***Allow your pan to heat for at least a few minutes otherwise the fish will not get brown like you want it to while making sure you do not burn the olive oil.
Keep your stove on high heat and place your fish filets in the pan "belly" side down first. Sear until the belly starts to turn a golden brown. This should take no longer than 1.5 minutes.
Flip your filet over and cook the skin for 0.5 minute.
If you are preparing a meal, this should be the last thing you cook since it takes so little time.


Pin It

Wednesday, November 9, 2011

To Die For Couscous

Usually I make couscous from the box. However, I was inspired to make my own couscous concoction after I had some wonderful couscous at a restaurant. My husband and I put our brains together about what made that couscous so good and this is what we came up with! This recipe makes enough for a family of four so you can half the recipe if you want to serve this for two.
Ingredients
1/2 Pound Middle Eastern couscous
1/4 Pound of FRESH sun-dried tomato pesto
***You can find this at Whole Foods where they have the pre-made pestos that you scoop out yourself.
Salt and pepper to taste

Directions 
Bring a pot of water to a boil.
Empty couscous into the boiling water and cook for about 10 minutes or until al dente.
After draining the water from the couscous, return the couscous to the pan and stir in the sun-dried tomato pesto.
Add salt and pepper to taste and enjoy! This couscous is so flavorful and makes the perfect accompaniment to any dinner.
Buying the couscous and the fresh sun-dried tomato pesto costs about $3.50 which is about how much a box of good couscous costs. My version makes a lot more than the box and is also fresh!
Pin It

Tuesday, November 8, 2011

Healthy & Homemade Tomato Basil Soup

Let me begin by saying, this does not taste like La Madeline's tomato basil soup because I did not use a stick of butter or heavy cream in it. With that being said, this recipe is still yummy and much better for your figure! Once again this recipe comes from the cookbook, "Cooking with Class."
Ingredients
1 Tbsp of olive oil
1 Small onion, chopped
1 Clove of garlic, minced
1 Carrot, peeled and chopped
1 Large (28 ounce) can diced tomatoes (USE LIQUID)
2 Cups of chicken broth
***Do not use low sodium chicken broth otherwise you will have to add a lot of salt which is what I ended up having to do because it was too bland.
4 Tbsp of tomato paste
2 Tsp of dried basil or a handful of fresh basil leaves
Salt and pepper
1 Small (14 ounce) can diced tomatoes (OPTIONAL)
In a large pot, heat olive oil and add onion, garlic and carrots. Saute until softened (about 15 minutes).
Add tomatoes, chicken broth, tomato paste and basil. Simmer for 20 minutes.
Puree mixture with hand wand or in the blender. If you like your tomato soup smooth, then you will have to blend for longer.
Return to pot and add parsley, salt and pepper.
If you prefer a chunkier soup, you can add the extra can of diced tomatoes. However, I opted against this as I like my tomato soup smooth.
Serve hot with a dash of chopped parsley, fresh basil or parmesan on top.
My husband and I enjoyed this with a grilled cheese!
You can make this 2 days ahead of time and it will last for up to a week in the refrigerator. Pin It
 
Design by Small Bird Studios | All Rights Reserved